Steps to properly installing a wheel end
To avoid catastrophic wheel end failure, it is important to follow proper inspection and
maintenance procedures as outlined here. Not only will this lead to safer operation of commercial
vehicles, it will also lead to increased fleet uptime and reduced maintenance cost.
November/December 2017 | VehicleServicePros.com 27
ore and more commercial vehicles
are transporting goods across North
America with truck drivers logging
billions of miles annually. With more
commercial vehicles on the road, it is
ever more critical to properly maintain wheel ends
in order to help avoid the potential of catastrophic
wheel off s.
It is important to periodically inspect a vehicle’s
wheel ends to ensure safety and maximize
over-the-road performance. Inspection will help
determine if a wheel end repair is necessary.
Manufacturers can vary on their recommendations
of a detailed inspection, from every 50,000
miles or every six months to 100,000 miles or
every 12 months, or more.
Before performing an inspection, always follow
the manufacturer’s safety guidelines.
3
It is highly recommended to wear eye protection
to avoid serious eye injury, and protective
clothing as needed.
Components of a
wheel end system
A typical wheel end system consists of a seal,
an inboard and outboard tapered bearing and a
hubcap. Additional components include a spindle
nut and wheel nuts. Some wheel end systems
may also contain a spacer that is meant to provide
preset torquing.
Each component plays a vital role in protecting
the wheel end as well as the operator.
Th e seal may be one of the more critical components
in the system, as it is meant to keep the oil
or grease in the hub unit and contaminants from
getting into the hub. Th is keeps the bearings prop-
M
Continued Page 28
WHEEL ENDS
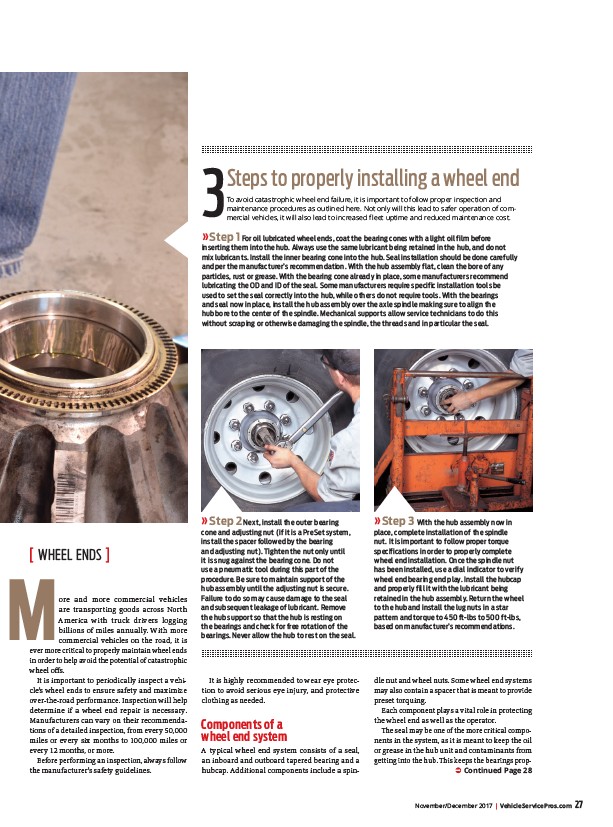
» Step 1 For oil lubricated wheel ends, coat the bearing cones with a light oil film before
inserting them into the hub. Always use the same lubricant being retained in the hub, and do not
mix lubricants. Install the inner bearing cone into the hub. Seal installation should be done carefully
and per the manufacturer’s recommendation. With the hub assembly flat, clean the bore of any
particles, rust or grease. With the bearing cone already in place, some manufacturers recommend
lubricating the OD and ID of the seal. Some manufacturers require specific installation tools be
used to set the seal correctly into the hub, while others do not require tools. With the bearings
and seal now in place, install the hub assembly over the axle spindle making sure to align the
hub bore to the center of the spindle. Mechanical supports allow service technicians to do this
without scraping or otherwise damaging the spindle, the threads and in particular the seal.
» Step 3 With the hub assembly now in
place, complete installation of the spindle
nut. It is important to follow proper torque
specifications in order to properly complete
wheel end installation. Once the spindle nut
has been installed, use a dial indicator to verify
wheel end bearing end play. Install the hubcap
and properly fill it with the lubricant being
retained in the hub assembly. Return the wheel
to the hub and install the lug nuts in a star
pattern and torque to 450 ft-lbs to 500 ft-lbs,
based on manufacturer’s recommendations.
» Step 2 Next, install the outer bearing
cone and adjusting nut (if it is a PreSet system,
install the spacer followed by the bearing
and adjusting nut). Tighten the nut only until
it is snug against the bearing cone. Do not
use a pneumatic tool during this part of the
procedure. Be sure to maintain support of the
hub assembly until the adjusting nut is secure.
Failure to do so may cause damage to the seal
and subsequent leakage of lubricant. Remove
the hub support so that the hub is resting on
the bearings and check for free rotation of the
bearings. Never allow the hub to rest on the seal.
/VehicleServicePros.com